WordPress: get author info / user details from post id

Some times we needed to pull out the author data from a post id. It is very easy do it in wordpress.

It can be accomplished by the_author_meta() function or get_the_author_meta() function. You will need call this function in your theme or plugin, through a hook.

the_author_meta() –> Outputs the data, just like echo
get_the_author_meta() -> holds the value in value.

We can get the data like this :


$auth = get_post($post_ID); // gets author from post
$authid = $auth->post_author; // gets author id for the post
$user_email = get_the_author_meta('user_email',$authid); // retrieve user email
$user_firstname = get_the_author_meta('user_firstname',$authid); // retrieve firstname
$user_nickname = get_the_author_meta('nickname,$authid); // retrieve user nickname

The following list of user fields you can retrieve using this function.

  • user_login
  • user_pass
  • user_nicename
  • user_email
  • user_url
  • user_registered
  • user_activation_key
  • user_status
  • display_name
  • nickname
  • first_name
  • last_name
  • description
  • jabber
  • aim
  • yim
  • user_level
  • user_firstname
  • user_lastname
  • user_description
  • rich_editing
  • comment_shortcuts
  • admin_color
  • plugins_per_page
  • plugins_last_view
  • ID


CORS policy: No ‘Access-Control-Allow-Origin’

Font from origin domain.dev has been blocked… (CORS and browsersync)

If you are getting issue fonts are blocked in web client CORS then below code will help you. Use the code in .htaccess file and problem will be resolved 🙂
# Allow access from all domains for webfonts.
<IfModule mod_headers.c>
<FilesMatch “\.(ttf|ttc|otf|eot|woff|woff2|font.css|css)$”>
Header set Access-Control-Allow-Origin “*”
</FilesMatch>
</IfModule>

How to use WordPress Shortcode in template

Shortcodes in WordPress are little bits of code that allow you to do various things with little effort. You can use in the content area to invoke some kind of function to accomplish certain tasks.

But what if you want to use a shortcode from within a template instead of with the content of a Post/Page? You can invoke it with a special function:

<?php echo do_shortcode("[shortcode]"); ?>

What is WordPress Permalink

WordPress offers you the ability to create a custom URL structure for your permalinks and archives. Custom URL structures can improve the aesthetics, usability, and forward-compatibility of your links.

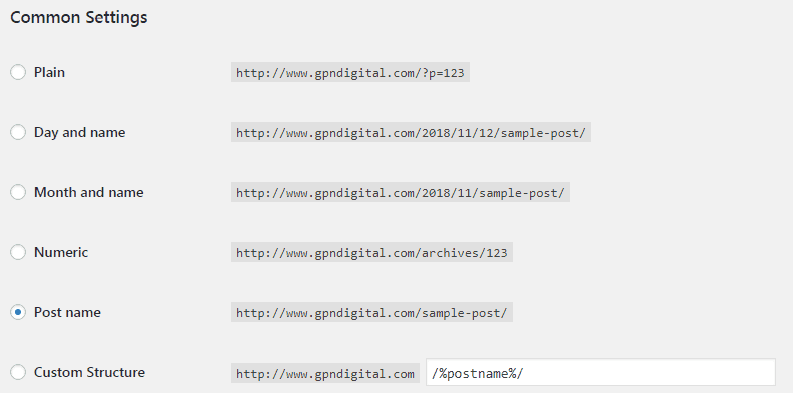
Permalinks are the permanent URLs of your individual blog post or page on your WordPress site. Permalinks are also referred to as pretty links. By default, WordPress URLs use the query string format which look something like this:

http://www.example.com/?p=123

  • where “123” is the ID of a given post or page in the database.

To set permalinks in WordPress

There are two way to set permalinks on the Wordrpess sites:

  1. You need to set the permalink structure right after you launch a new WordPress site.
  2. You should set the permalinks for every piece of content individually.

1. How to set the permalink structure in WordPress

There are various different formats that you can use. Day and name, Month and name, Numeric, Post name, and Custom structure. Any format that is not the default one is SEO friendly. It just comes down to your preference after that.

Go to Settings » Permalinks option page,  Once there, select this option:

  • Just to make sure we’re on the same page, it’s the one labeled “Post name.”

Now, why this one?

Quite simply, it holds the least amount of unneeded clutter… There are no seemingly random numbers, no dates, no arbitrary words (like “archives”). There’s just the post name that you can control 100% (more on that in the next point).

Note. Why you don’t want dates in your permalinks? The main reason is because dates discourage your visitors from reading your older content. Any date that’s older than last week (or so) looks like out-of-date information, despite the fact that it might still be very valid, or might even be evergreen.

After you select that new permalink structure (“Post name”), just click “Save Changes” at the bottom of the settings page.

2. How to set the individual permalinks for posts/pages

You can update permalink directly on the each individual posts or pages. For example you see here


Click on the edit and you can update anything…..

Oh, Finally update the page 🙂 and you’r done!!

Fix 404 error in WordPress category / tag page

Sometimes, especially after switching themes, WordPress will generate 404 errors on the category and tag pages. There might be multiple reasons – and also multiple solutions – to this, here is simple solution and it will fix the issue

Go to your WordPress backend, click Settings, click Permalinks. Make sure the category base is “category” and the tag base is “tag” (unless you have some VERY weird special settings) and simply press the “save changes” button. Even if nothing has changed, clicking the button will probably make your category and tag pages work again now.

Oh, Finally Don’t forget to clear the cache…. 🙂


Fix wordpress post 404 error

WordPress is fantastic CMS. Most of the world love it feature and flexibility. I am always try to recommend my clients to use this. Sometimes wordpress users face common problems and one of them in posts 404 error. Today we will learn how we can fix this issue.

This is the simple setting we can do fix this issue easy way.

Go to Settings » Permalinks, and simply click on Save Changes button. This will update your permalinks settings and flush rewrite rules. In most cases this solution fixes theWordPress posts 404 error. However, if it does not work for you, then you probably need to update your .htaccess file manually.

Login to your server using FTP, and modify the .htaccess file which is located in root folder. The easiest thing you can do is to temporarily make the file writeable by changing the permissions to 644.  You can should manually add this code if that is not alreay in in .htaccess file. If .htaccess file not available then you must upload this file.

# BEGIN WordPress
RewriteEngine On
RewriteBase /
RewriteRule ^index\.php$ - [L]
RewriteCond %{REQUEST_FILENAME} !-f
RewriteCond %{REQUEST_FILENAME} !-d
RewriteRule . /index.php [L]
# END WordPress

Redirect all url to https

If you have a secure certificate (SSL) on your website, you can automatically redirect visitors to the secured (HTTPS) version of your website to make sure their information is protected.

Using the following code in your .htaccess file automatically redirects visitors to the HTTPS version of your site:

RewriteEngine On
RewriteCond %{HTTPS} off
RewriteRule ^(.*)$ https://%{HTTP_HOST}%{REQUEST_URI} [L,R=301]

If you have an existing .htaccess file:

  • Do not duplicate RewriteEngine On.
  • Make sure the lines beginning RewriteCond and RewriteRule immediately follow the already-existing RewriteEngine On.

How To Create WordPress Shortcodes

WordPress introduced the shortcode API in version 2.5. Shortcodes are now used by a large number of WordPress plugins to allow users to add content to their posts and pages. All of us have probably used them at one time or another. They usually come bundled with plugins, or even themes, and what they do is watch for when you insert something inside square brackets then replace that with some other content; it could be a simple sentence or it could be a massive PHP function, it all depends on what you instructed WordPress to do.

The shortcode API allows you to create your own shortcodes by adding functions to your theme functions.php template (this is located at www.yourwebsite.com/wp-content/themes/yourtheme/).

In addition to creating your own shortcodes, WordPress also includes five default shortcodes with the WordPress core:
audio – Allows you to embed audio files.
caption – Allows you to wrap captions around content. It is commonly used with images.
embed – Allows you to embed a wide range of content such as video, audio and tweets.
gallery – Allows you to insert image galleries.
video – Allows you to embed video files.

In this article we will create some simple WordPress shortcodes to help you create any functionality you like.

A Basic Example

In our first example we want to create a shortcode that will create some “custom text” every time we type [spin2win] into the editor. First we need to create the callback function that will return the “custom text”

function spin2win_func() {
return “I am new shortcode text”;
}

Next we need to add this shortcode to WordPress using the add_shortcode function in either our functions.php file

add_shortcode( ‘spin2win’, ‘spin2win_func’ );

So the full code would be like this :

function spin2win_func() {
return “I am new shortcode text”;
}
add_shortcode( ‘spin2win’, ‘spin2win_func’ );

Note : spin2win_func and spin2win can be any name.

Creating a Shortcode With Attributes

Attributes can expand the functionality of shortcodes by allowing you to pass data through your shortcodes.

When WordPress encounters this we want a function that will insert an image. It needs to read the width and height attributes

function get_images($atts) {
extract(shortcode_atts(array(
‘width’ => 250,
‘height’ => 180,
), $atts));
return ‘‘;
}

add_shortcode(‘getpics’, ‘get_images’);

That’s all 🙂

Media query for large screen

Here is media query for large screen. You can apply the breakpoints and enjoy the work.

@media screen and (min-width: 1400px) {

}
@media screen and (min-width: 1600px) {

}
@media screen and (min-width: 1900px) {

}

How to change continue reading link text in wordpress

How to change continue reading link text in wordpress. In this tutorial I will show you how you can change the “continue reading” text in wordpress. If you want to modify continue reading link with Read more , you can use this function in your functions.php file.

function my_code_excerpt_more( $more ) {
return ‘ ‘ . __(‘Read More’, ‘your-text-domain’) . ‘‘;
}
add_filter( ‘excerpt_more’, ‘my_code_excerpt_more’ );

May be your theme does have another text except “continue reading”, so this trick also will work for those.